
06 Nov Using Company Reports
The “Reporting” module is broken down into two parts – “Company Reports” and “Community Reports“.
“Company Reports” are copies you’ve made of your preferred “Community Reports”, or custom reports that Hasmate has built for you.
“Community Reports” are an ever-growing number of reports that cover all modules, e.g. incident reports, hazard reports, training reports, etc.
Using Company Reports
Click on “Reporting” on the main navigation, then choose “Company Reports” from the dropdown.
Company Reports are Community Reports that you’ve copied by using the “Copy to Company Reports” button. If your Company Reports section is empty, have a look through Community Reports until you find a report that suits your needs.
For suggestions about reports to use, please contact us.
You’ll see a search system at the top, and any reports listed below.
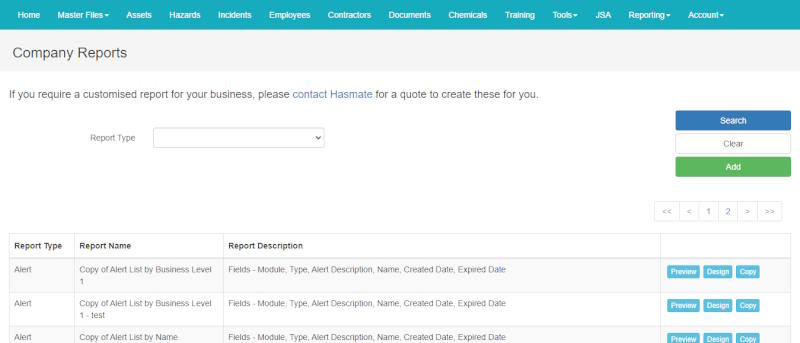
The list of reports show:
- Report Type – this is the Hasmate module that this report is based on;
- Report Name – this name is to give you an idea about what this report does – all reports in Company Reports will be called “Copy of XX”;
- Report Description – this can include the purpose of the report, and an idea of what fields are included in the report;
- The “Preview” button; and
- The “Design” button – not for client use. You can use this to rename a report if required. If you need a particular report built, please get in touch.
- The “Copy” button – this replicates the report and adds the copy into your “Company Reports” list.
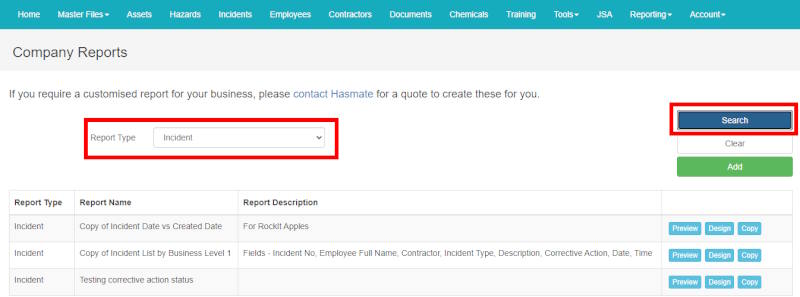
Using the Search System
To use the search system to only show incident reports (for example), choose “Incident” from the “Report Type” dropdown, and then click “Search“. This will then refresh the report list, and will only show incident reports that you have saved into Company Reports.
To clear the search, click “Clear“, and the report list will show the full list of reports again.
Previewing a Report
To open a report, either double click the report name, or click the “Preview” button.
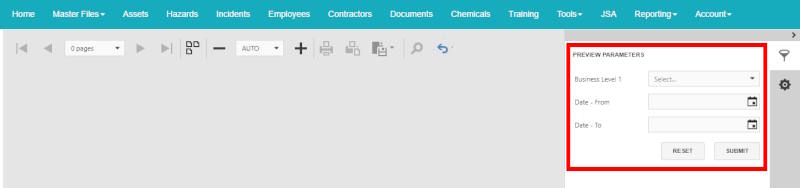
Depending on the report, you may see preview parameters on the right side. These help determine what information is displayed in the report.
Examples of these are:
- Business Level 1 – this will be a dropdown of your branches/departments/sites – whatever you have set up in the program. Choosing one or more of these will determine what information shows on the report, e.g. only information related to the Hastings branch, or all branches.
- Date – From and Date – To – if the report you are looking at is to do with incidents, this allows you to choose a date range for the incident dates, e.g. only incidents from 1/10/2023 to 31/10/2023. Same goes for Expiry Date – From/To, and Review Date – From/To.
- Asset is Active/Active Employee/Active Chemical/Active Contractor (or similar) – choose “Yes” if you want to only show information about active assets/employees/chemicals/contractors (e.g. haven’t been made inactive in the program), or choose “No” if you want to only show information about inactive assets/employees/chemicals/contractors.
- Type/Compliance Type/Training Module/Contractor Type, etc. – this is a way of filtering the report to only show information about a particular type, module, etc. – or all options.
Click “Submit” when you have chosen your filters.
You’ll now see your report in the main part of the screen.

Explaining the Buttons
There is a number of buttons above the report.

This shows you how many pages your report is, and allows you to navigate using the arrows to each page, or by using the dropdown for the page number.
![]()
This allows you to view all pages on one screen (Multi Page Mode), and back to the single page view.
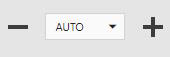
This allows you to determine the zoom on your report, using the + and – to increase/decrease the zoom, or using the dropdown for the appropriate zoom level.

These two buttons are for printing. The first takes you through to a print screen for you to determine how you would like to print the report. The second button does the same thing, but only for the report page you are looking at currently, not the whole report (if multiple pages)

This gives you options for downloading the report:
- PDF – this is the most common!
- XLS
- XLSX
- RTF
- MHT
- HTML
- Text
- CSV – an unstyled spreadsheet – which is great if you are going to create graphs from the data.
- Image – this will save the entire report as a single .png file.
![]()
This brings up a search bar on the right hand side, where you can search for particular words in the report.
![]()
This takes you back to the rest of the Company Reports.
If you have further questions or require training on using the Hasmate program, please contact Hasmate.