31 Aug JSA Module – the Inspections section
Posted at 11:13h
in JSA Module
This section allows the user to note down all inspections that occur on the job, what the results were, who completed them, and when they should be reviewed.
Inspections Section
(Note – click the > beside the “Inspections” heading, and you’ll see the information table).
We have built this section keeping in mind that an inspection may be completed by one of your employees, or by a subcontractor.
This section is made up of the following fields:
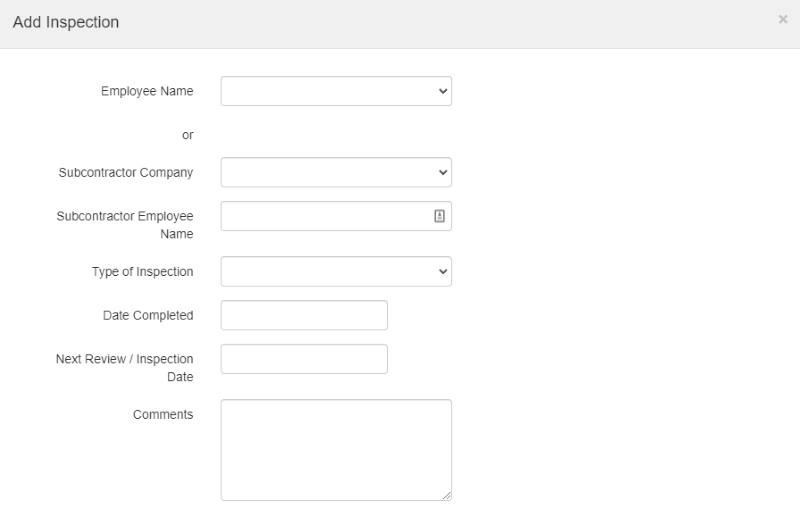
- Employee Name – choose one of your Employees (from the dropdown) – this will show active and inactive employees. This should be the employee that undertook the inspection. Note – if you choose an Employee Name, you will not be able to fill in the Sub Contractor Company and Subcontractor Employee Name fields – and vice versa.
- Sub Contractor Company – this is a new Master File. This should be the company that undertook the inspection. Note – if you choose a Sub Contractor Company from the dropdown, you will not be able to fill in the Employee Name field – and vice versa.
- Subcontractor Employee Name – this is a text box for you to type the name of the employee into. This should be the subcontractor employee that undertook the inspection. Note – if you type in a Subcontractor Employee Name, you will not be able to fill in the Employee Name field – and vice versa.
- Type of Inspection – this is a new Master File. This is the type of inspection.
By default, this Master File will have the following options set up – Building Inspection, Final Building Compliance Inspection, Major Plant and Equipment Inspection, Prestart Inspection, Site Inspection, Special MEWP/Cranes Inspection, Vehicle Inspection. To find out how to change any Master Files, click here. - Date Completed – the date that the inspection was completed.
- Next Review/Inspection Date – this will create an alert when this is coming up for expiry.
- Comments – this is a place to make any notes about the inspection.
To add in an inspection, click “Add Inspection“. You’ll see the form below. Fill in the appropriate fields, and click “Save“.

An example of how this section could look:

If you have further questions or require training on using the Hasmate program, please contact Hasmate.


