
07 Sep JSA Module – the Contract Safety Management section
Contract Safety Management Plan Section
(Note – click the > beside the “Contract Safety Management Plan” heading, and you’ll see the information table).
This section is for breaking up the project into steps, and identifying the hazards associated with each step.
This section is made up of the following fields:
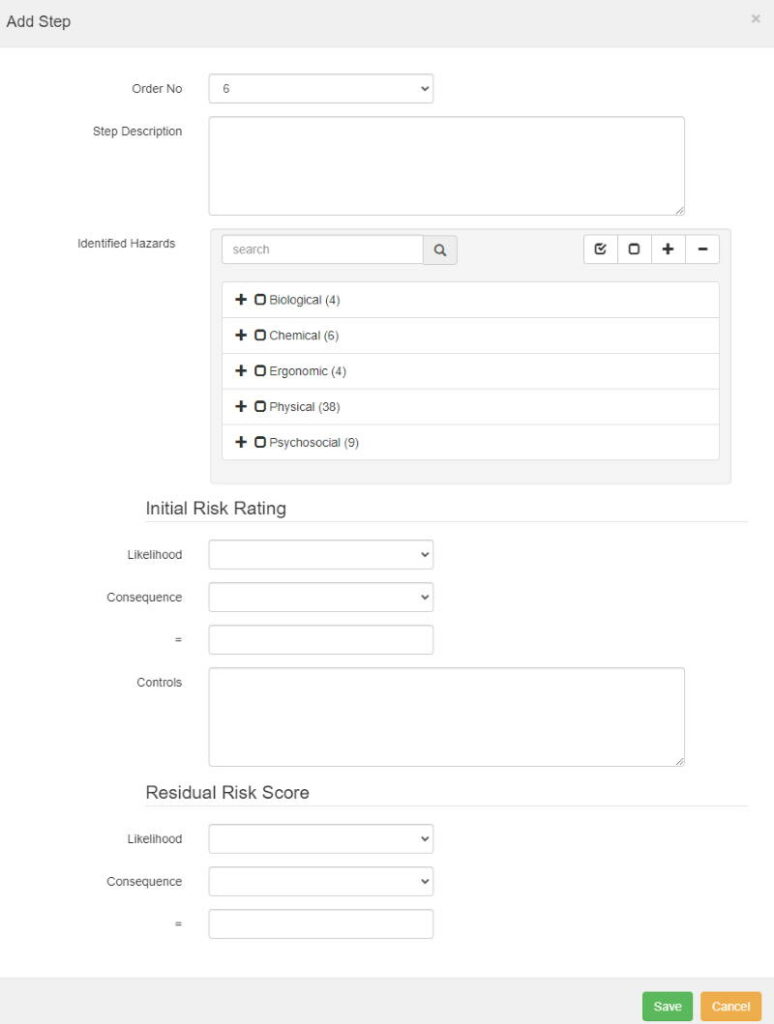
- Order – by default, this will start at 1. However, if you decide you need to re-order the steps, you can “Edit” any step, and change the “Order” to another number, e.g. change Step 2 to Step 1. Make sure you then change the previous Step 1 to Step 2.
- Step Description – describe what will happen in this step.
- Identified Hazards – this is a new Master File.
By default, this Master File will have the following options set up – Animals, Asbestos, Combustible/Explosive/Flammable Materials, Contaminated Site, Difficult Entry or Exit, Dust, Enclosed/Confined Spaces, Engulfment, Forklifts, General Public/Bystanders, Hazardous Substances, Heavy Machinery, Ladders/Elevated Work Platform, Machinery, Manual Handling, Noise from Plant/Machinery, Other Contractors on Site, Overhead Power Cables, Poisonous Fumes/Gas, Potential for Difficult Rescue, Pressurized Fluids/Gas, Remote Location, Scaffolding, Sewerage, Sharp Materials, Slippery Surface, Steep Roof, Steep Slopes, Suspended Loads, Temperature Extremes, Traffic and Vehicle Movements, Trip Hazards, Unauthorised Persons, Underground Services, Unstable Ground Conditions, Weather Conditions, Wind, Working Alone, Working at Heights. To find out how to change any Master Files, click here.
Click into any hazard category, and tick all appropriate hazards for that step. - Initial Risk Rating – choose the appropriate “Likelihood” and “Consequences“, and this will calculate automatically. For more information about risk assessment, click here.
- Controls – describe what controls you will have in place to mitigate the risk.
- Residual Risk Score – choose the appropriate “Likelihood” and “Consequences“, and this will calculate automatically. For more information about risk assessment, click here.
To add in a step, click “Add Step“. You’ll see the form below. Fill out the appropriate information, and click “Save“.
An example of how this section could look:

Environmental Management Plan Section
(Note – click the > beside the “Environmental Management Plan” heading, and you’ll see the information table).
Click “Edit” to make changes to this section.
This section is made up of the following fields:
- Will the vehicles be refuelled on site – this is a Yes/No field.
- What are the emergency and control plans in case of a fire – describe (in detail) the plan. Make sure to attach any additional documents into “Attachments“.
- Detail how fuel and oil leaks will be controlled – describe (in detail) the plan. Make sure to attach any additional documents into “Attachments“.
- Who is responsible for managing this onsite? – choose one of your Employees (from the dropdown) who is managing this job.
Site Waste Section
(Note – click the > beside the “Site Waste” heading, and you’ll see the information table).
Click “Edit” to make changes to this section.
This section is made up of the following fields:
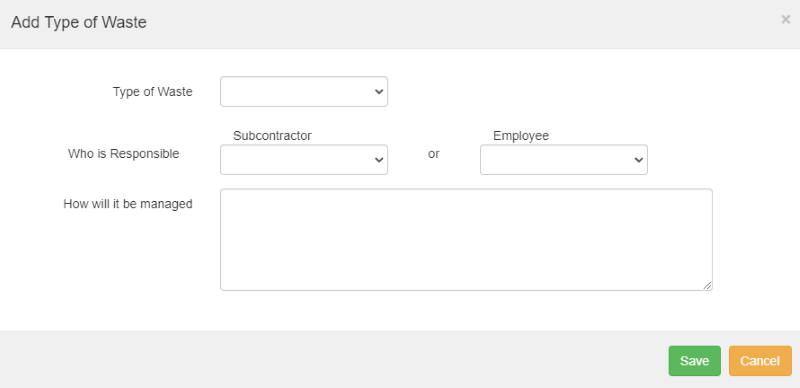
- Type of Waste – this is a new Master File.
By default, this Master File will have the following options set up – GIB board, Plastic wrap, Surplus concrete, Timber offcuts. To find out how to change any Master Files, click here. - Who’s Responsible – this allows you to choose from the “Subcontractor” dropdown (from MasterFiles) or one of your Employees (from the dropdown).
- How will it be managed? – describe (in detail) the plan. Make sure to attach any additional documents into “Attachments“.
To add in a step, click “Add Type“. You’ll see the form below. Fill out the appropriate information, and click “Save”.
An example of how this section could look:

Potential Environmental Risks
(Note – click the > beside the “Potential Environmental Risks” heading, and you’ll see the information table).
This section is made up of the following fields:
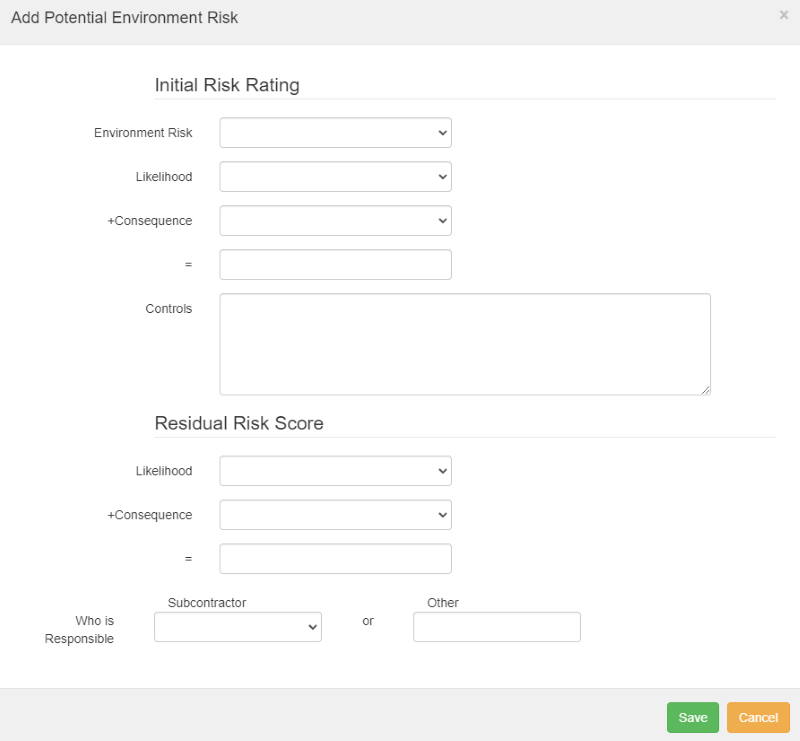
- Environmental Risk – this is a new Master File.
By default, this Master File will have the following options set up – Asbestos, Birdlife/nesting, Burial Sites, Chemical Containers, Concrete Slurry, Damage to Footpaths, Damage to Roads, Dust, Fuel/Oil Spillages, Hazardous Substances, Odour, Protected Trees, Rubbish Storage/Disposal, Sewerage & Toilets, Soil Contamination, Soil Disposal, Stream Contamination, Trees, Vegetation, Vibration, Wai Tapu Sites, Water Contamination, Waste Concrete, Wildlife. To find out how to change any Master Files, click here. - Initial Risk Rating – choose the appropriate “Likelihood” and “Consequences”, and this will calculate automatically. For more information about risk assessment, click here.
- Controls – describe what controls you will have in place to mitigate the risk.
- Residual Risk Score – choose the appropriate “Likelihood” and “Consequences“, and this will calculate automatically. For more information about risk assessment, click here.
- Who is Responsible – this allows you to choose from the “Subcontractor” dropdown (from MasterFiles) or type in an “Other” option.
To add in a risk, click “Add Risk“. You’ll see the form below. Fill out the appropriate information, and click “Save“.
An example of how this section could look:

If you have further questions or require training on using the Hasmate program, please contact Hasmate.